1. Is the UV lamp not turning on?
1.1. Is the power supply connected properly?
PROBLEM:
The UV lamp may not turn on if the power supply is not connected properly.
PREVENTION:
- Ensure all power and lamp cables are securely connected.
- Verify connectors match and are seated properly.
- Regularly inspect power and lamp cords for damage.
If yes, proceed to 1.2.
If no, reconnect the power supply properly.
1.2. Is the outlet supplying power?
PROBLEM:
A faulty outlet or power source can prevent the lamp from receiving electricity.
PREVENTION:
- Test the outlet with a known working device.
- Use outlets that are regularly maintained and tested.
- Avoid overloading circuits.
If yes, proceed to 1.3.
If no, check the circuit breaker or use a different outlet.
1.3. Is the fuse intact or circuit breaker tripped?
PROBLEM:
A blown fuse or tripped circuit breaker interrupts the electrical circuit.
PREVENTION:
- Use fuses and breakers rated appropriately for the lamp's power consumption.
- Inspect fuses regularly and replace damaged ones.
- Avoid electrical overloads by not connecting too many devices to the same circuit.
If fuse is intact or breaker reset, proceed to 1.4.
If fuse blown or breaker tripped, replace the fuse or reset the breaker.
1.4. Is the ballast or driver functioning correctly?
PROBLEM:
A faulty ballast or driver can prevent the lamp from igniting by failing to regulate the voltage and current correctly.
PREVENTION:
- Regularly test and maintain the ballast/driver.
- Use ballasts compatible with your lamp.
- Protect ballasts from environmental damage such as moisture or heat.
If yes, proceed to 1.5.
If no, replace or repair the ballast/driver.
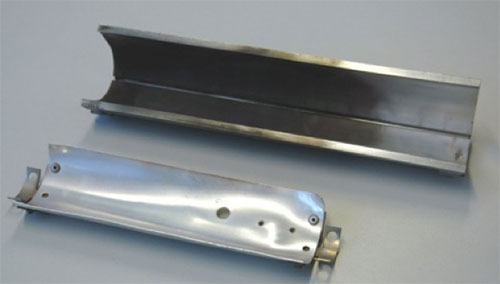
1.5. Is there any cap and seal damage due to current overload or high temperatures?
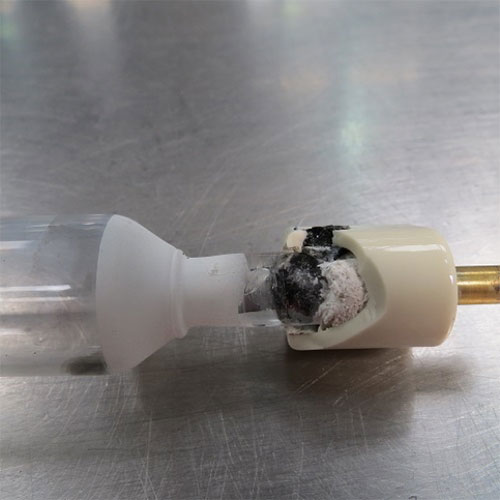
PROBLEM:
If a UV lamp is exposed to a current overload or excessively high temperatures, the electrical connection can break down. Overcurrent situations are generally due to power supply faults, not a fault in the lamp design itself. The electrical connections at the end of each UV lamp are designed to withstand temperatures of no more than 250°C. This problem causes electrical arcing between the lamp and the lamp holder, which can result in a hole being burnt through the cap, destroy the lamp, and potentially even damage the UV system.
PREVENTION:
- Ensure the right UV lamp is chosen for your power supply and that the power supply is operating correctly.
- Keep ceramic cap and seal below 250°C.
- Ensure the lamp is correctly placed within the lamp head.
- Inspect caps for damage before placing into the system.
- Always allow lamp to cool before restarting
If yes, replace the lamp, ensure the power supply is operating correctly, and that the lamp is correctly placed in the lamp head. Inspect caps for damage before installation.
If no, proceed to 1.6.
1.6. Has the lamp been tested for leaks in the seal (leaking air into the lamp envelope)?
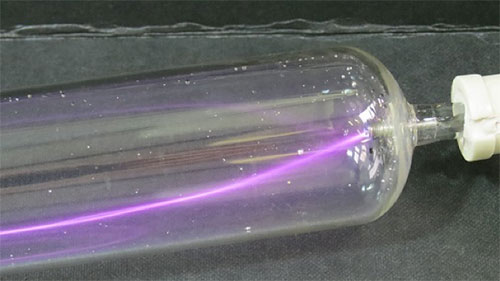
PROBLEM:
In the unlikely event the UV lamp doesn’t strike out of the box, it is possible this is due to leaking—meaning air is entering into the lamp envelope. The only way to confirm this technical issue is by using a high-frequency lamp tester. A constricted purple or blue arc, or no discharge at all, indicates there may be a small leak in the seal, which is unlikely to be visible to the naked eye.
PREVENTION:
- Unfortunately, there is no prevention to this problem. Pack the lamp and return it to the manufacturer.
If yes, return the lamp to the manufacturer.
If no, test the lamp using a high-frequency lamp tester.
Watch Our Video
2. Is the UV lamp flickering or unstable?
2.1. Is the voltage supply stable and within specifications?
PROBLEM:
Voltage fluctuations can cause the lamp to flicker or operate unstably, affecting performance.
PREVENTION:
- Use a voltage regulator or stabilizer.
- Ensure the electrical supply meets the lamp's voltage requirements.
- Avoid using the lamp on circuits with heavy machinery that can cause fluctuations.
If yes, proceed to 2.2.
If no, stabilize the voltage supply.
2.2. Are there any appliances causing voltage fluctuations on the same circuit?
PROBLEM:
Other appliances, especially heavy-duty ones, can cause voltage dips or spikes when they turn on or off.
PREVENTION:
- Use a dedicated circuit for the UV lamp.
- Avoid running high-power devices on the same circuit.
If yes, isolate the lamp on a dedicated circuit.
If no, proceed to 2.3.
2.3. Is the lamp nearing the end of its rated life?
PROBLEM:
As lamps age, their components degrade, leading to instability and flickering.
PREVENTION:
- Keep track of operating hours.
- Replace lamps before they reach the end of their rated lifespan.
If yes, replace the lamp.
If no, proceed to 2.4.
2.4. Are all wiring connections secure and insulated?
PROBLEM:
Loose or damaged wiring can cause intermittent connections, leading to flickering.
PREVENTION:
- Regularly inspect wiring for signs of wear or damage.
- Ensure all connections are tight and properly insulated.
If yes, proceed to 2.5.
If no, secure and insulate all connections.
2.5. Is the ballast or driver compatible with the lamp?
PROBLEM:
Incompatible ballasts can supply incorrect voltage or current, causing instability.
PREVENTION:
- Use ballasts recommended by the lamp manufacturer.
- Verify compatibility before installation.
If yes, proceed to 2.6.
If no, replace with a compatible ballast/driver.
2.6. Has the ballast been tested under load for proper operation?
PROBLEM:
A ballast may appear functional without load but fail when the lamp is connected.
PREVENTION:
- Test ballasts under operational conditions.
- Replace ballasts that fail under load.
If yes, proceed to 2.7.
If no, test or replace the ballast/driver.
2.7. Are there environmental factors (like vibration or electromagnetic interference) affecting the lamp?
PROBLEM:
External vibrations or EMI can disrupt the lamp's operation, causing flickering.
PREVENTION:
- Install the lamp in a stable environment.
- Use EMI shielding if necessary.
- Isolate the lamp from sources of vibration.
If yes, secure the lamp fixture or reduce EMI sources.
If no, proceed to 2.8.
2.8. Is the lamp experiencing spiraling (plasma arc instability hitting the lamp walls)?
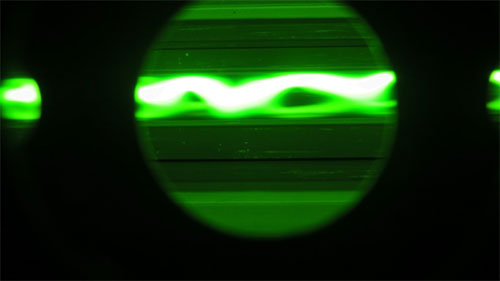
PROBLEM:
Spiraling is when the plasma arc is no longer wall-stabilized. The plasma arc spirals out of control, repeatedly hitting the inside surface of the lamp body, softening the quartz. Risk of spiraling is higher when:
- Running a lamp on a constant wattage transformer (with secondary series capacitors).
- More prevalent on lamps over 1m in length.
- The UV lamp in the system is not a standard mercury but a doped lamp (gallium or iron).
- The lamp operates at a higher voltage.
PREVENTION:
- If this is a common occurrence, consider changing the transformer.
- Ensure correct operating conditions.
- Consult a professional technician if necessary.
If yes, consider changing the transformer or consult a technician.
If no, consult a technician if flickering persists.
3. Is the lamp output reduced or appears dim?
3.1. Is the lamp surface and optical components (quartz plates, reflectors) clean and free from devitrification (clouding)?
PROBLEM:
When a UV lamp stops curing within the UV system, it's generally due to decreased output of UV light intensity, primarily because of the deterioration of the lamp and the transparency of the quartz body. UV radiation can no longer pass through the quartz wall due to devitrification, and the deteriorated electrodes are no longer capable of sparking a plasma arc. Longer wavelengths transmit through the quartz body fairly easily, but shorter wavelengths are absorbed in aging or poorly maintained UV lamps.
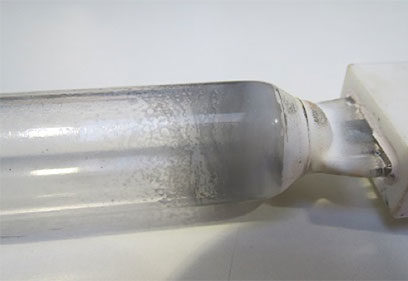
Devitrification/Clouding:
The basis of natural "devitrification" occurs when quartz converts back into a crystalline structure, which acts as a very poor UV transmitter. This process occurs after surface contamination and is accelerated when the UV lamp becomes too hot. Devitrification appears as many white spots on the surface of the quartz body, which causes a reduction of quartz transparency to UV light.
PREVENTION:
- Ensure lamp and components are clean before running the lamp and operate in a dust-free environment.
- Ensure lamp is run at correct volts and amps and that the UV system is properly cooled.
If yes, proceed to 3.2.
If no, clean the lamp and components using isopropanol wipes. Check for devitrification and replace the lamp if necessary.
Watch Our Video
3.2. Is the lamp near or at the end of its rated life?
PROBLEM:
Lamp output diminishes over time due to electrode wear and gas depletion.
PREVENTION:
- Monitor lamp hours and replace when nearing end-of-life.
- Use lamps designed for longer life if extended use is required.
If yes, replace the lamp.
If no, proceed to 3.3.
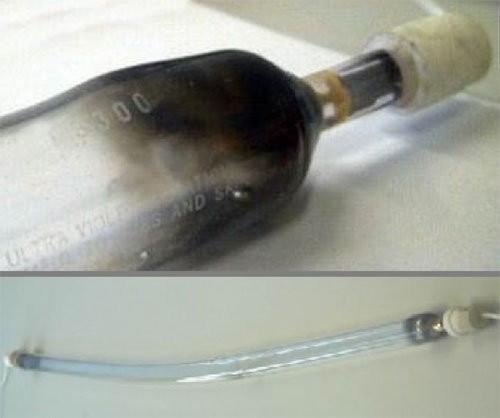
3.3. Is there noticeable blackening at the ends of the lamp (black ends/electrode erosion)?
PROBLEM:
Although tungsten has a high melting point, natural "blackening" occurs during the lifetime of a UV lamp due to very high arc temperatures operating between each electrode. During normal operation, the electrodes start to erode, and the tungsten material starts to sputter, depositing on the inside of the quartz body. When the transparency of the quartz body is compromised, UV output potential is significantly reduced.
PREVENTION:
- Use lamps with special material coatings on the end of the electrode to prolong the life of the electrodes.
- Avoid switching the UV lamp on and off between print runs; the biggest surge of current on the electrode happens at ignition.
- Utilize the standby mode designed by most UV system manufacturers, which keeps the lamp running at 50% even when not in use during the production shift, to avoid power cycling.
If yes, replace the lamp.
If no, proceed to 3.4.
Watch Our Video
3.4. Is the voltage/current supplied within the lamp's specifications?
PROBLEM:
Incorrect voltage or current can reduce lamp efficiency and output.
PREVENTION:
- Verify electrical supply matches lamp requirements.
- Use appropriate power supplies or transformers.
If yes, proceed to 3.5.
If no, adjust the electrical supply.
3.5. Is there mirror coating (condensation of tungsten and mercury) on the inside of the lamp ends?
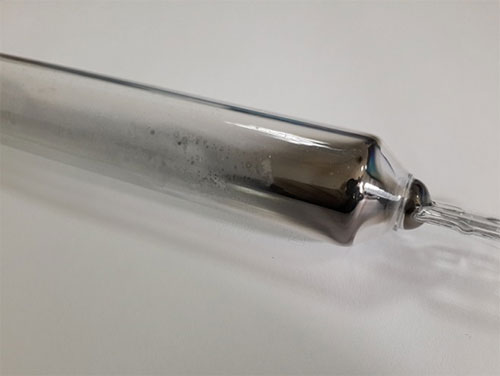
PROBLEM:
Over-cooling results in a combination of tungsten from the electrode and mercury condensing onto the inside of the lamp ends, giving it a mirror-coated effect.
PREVENTION:
- Alpha-Cure’s UV lamp ends are coated with heat-reflective materials such as; gold, platinum, silver & white paint, to keep the lamp shoulders hot. Contrary to popular belief white paint is the best reflective coating to retain heat within the lamp.
- The system is producing too much cool air that isn’t being properly circulated evenly along the length of the lamp. Remember to keep the lamp shoulder temperature above 600 °C, (1,112°F)..
- The UV lamp is not running at the correct power for prolonged periods, UV lamp operators should seek professional advice in this instance.
If yes, adjust airflow to ensure even cooling along the lamp length, keep lamp shoulders hot (above 600°C), and ensure the lamp runs at correct power.
If no, proceed to 3.6.
Watch Our Video
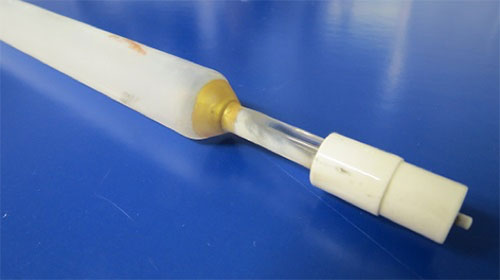
3.6. Is there any bowing or deformation of the lamp?
PROBLEM:
The UV lamp has overheated due to poor air circulation within the UV system. This is more common with longer lamps due to the increased requirement for airflow across a larger surface area. Overheating of the lamp body softens the quartz, which starts to sag under gravity or deforms from pressure differences.
PREVENTION:
- Keep lamps below 850°C.
- Adjust airflow and cooling around the lamp; ensure your cooling system is fully functioning.
- If possible, rotate the UV lamp by 180° weekly.
If yes, replace the lamp, ensure proper cooling, and avoid overheating.
If no, proceed to 3.7.
Watch Our Video
3.7. Is there external contamination on the lamp (fingerprints, dust, ink)?
PROBLEM:
External contamination of a UV lamp happens when foreign contaminants such as fingerprints or spray from powders, paper dust, and ink stick onto the outside surface of the quartz body. Sometimes contamination even occurs where the system reflector itself has come into direct contact with the lamp. These contaminants cause devitrification on the quartz body, so UV radiation is no longer able to pass through.
PREVENTION:
- Clean UV lamps frequently using isopropanol wipes.
- Always wear gloves when handling lamps and exert caution while cleaning and changing them.
If yes, clean the lamp carefully using isopropanol wipes.
If no, proceed to 3.8.
Watch Our Video
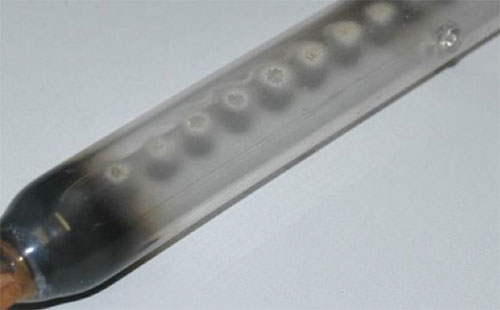
3.8. Is the airflow contaminated (spot devitrification aligned with cooling holes)?
PROBLEM:
In compressed air cooling systems, airflow contamination occurs, causing spot devitrification, denoted by the alignment of the cooling holes within the UV system reflector.
PREVENTION:
- Ensure compressed air is suitably clean and dry.
If yes, ensure compressed air is clean and dry.
If no, proceed to 3.9.
Watch Our Video
3.9. Are the UV reflectors clean and not deformed?
PROBLEM:
There are many different types of reflectors installed in various UV systems, from plain aluminium to extrusions, fabrications, and dichroic coatings. Around 60% of UV radiation that hits the substrate is actually reflected UV; loss of radiation causes significant loss of UV curing results. It is imperative that system reflectors are maintained and cleaned regularly. Poorly focused or distorted reflectors are also a very common reason for UV systems failing to cure.
PREVENTION:
- In most circumstances cleaning your system reflectors regularly with alcohol/isopropanol wipes will ensure good UV reflection.
- If 100% certain your UV reflector is not coated, or polish finished such as dichroic reflectors, you can use an abrasive rubber block to gently remove the dirt.
- If UV reflectors are beyond cleaning or distorted they must be replaced immediately. Contact Alpha-Cure for a quote on your replacement UV reflectors.
If yes, proceed to 3.10.
If no, clean reflectors or replace if necessary.
Watch Our Video
3.10. Is the lamp producing UV light below full intensity?
PROBLEM:
If UV light falls below full intensity, the UV lamp will not reach the necessary levels required for the curing of inks, adhesives, and varnishes.
PREVENTION:
- Address any of the previously mentioned issues causing reduced UV output.
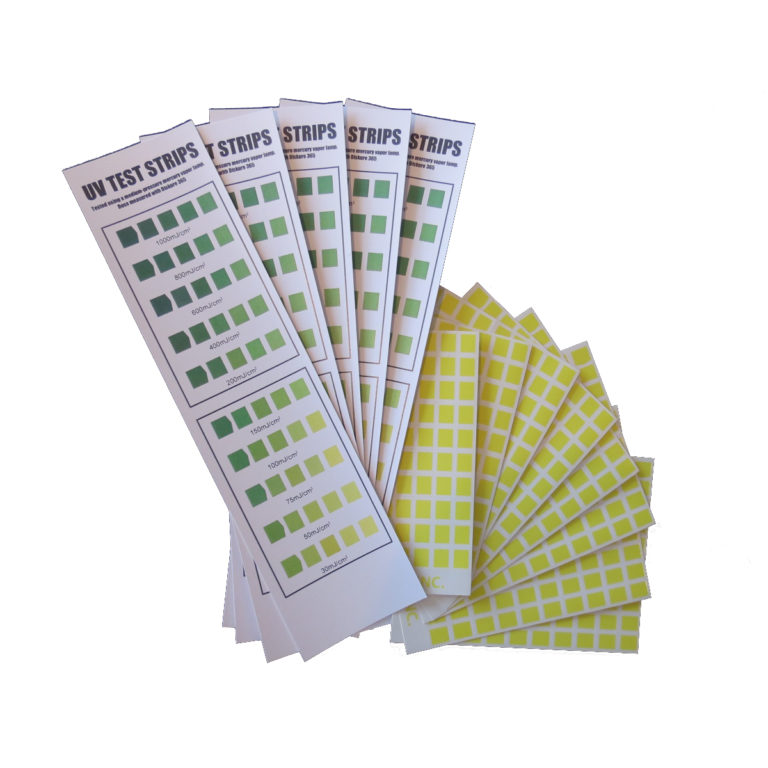
- Perform a simple test with UV test strips to ascertain if the UV lamp is still not producing full intensity.
- Check if system is operating at corect voltage
If yes, perform a UV intensity test using UV test strips.
If no, proceed to 3.11.
3.11. Are the inks, coatings, or adhesives properly formulated and mixed?
PROBLEM:
Ultraviolet curable inks, coatings, and adhesives, when not properly mixed, can lead to unequally distributed photo-initiators, which can negatively affect the curing results.
PREVENTION:
- Ensure all UV inks, coatings, adhesives are mixed thoroughly before application so that the photo-initiator is uniformly dispersed.
If yes, proceed to 3.12.
If no, mix materials thoroughly before application.
3.12. If output remains reduced after all checks, consult the manufacturer or a professional technician.
4. Is the lamp's lifespan shorter than expected?
4.1. Is the lamp operated under correct voltage and cooling conditions?
PROBLEM:
Operating a lamp under incorrect conditions accelerates wear and reduces lifespan.
PREVENTION:
- Follow manufacturer specifications for voltage and cooling.
- Use proper cooling systems to maintain optimal temperatures.
If yes, proceed to 4.2.
If no, adjust the operating conditions to meet the lamp's specifications.
4.2. Is the lamp frequently turned on and off (switching cycles), leading to increased electrode erosion?
PROBLEM:
Frequent switching cycles cause increased loading on the electrodes at ignition, leading to faster erosion and reduced lamp life.
PREVENTION:
- Avoid frequent power cycling; use standby modes to keep the lamp running at reduced power when not in use.
If yes, avoid frequent power cycling; use standby modes.
If no, proceed to 4.3.
Watch Our Video
4.3. Is the lamp overheating during operation?
PROBLEM:
Excessive heat can damage components and shorten lamp life.
PREVENTION:
- Ensure adequate ventilation and cooling.
- Monitor operating temperatures regularly.
If yes, improve cooling or reduce the operating temperature.
If no, proceed to 4.4.
4.4. Is the lamp being used in a harsh environment (e.g., vibration, moisture, dust)?
PROBLEM:
Harsh conditions can physically damage the lamp or affect its performance.
PREVENTION:
- Protect the lamp with appropriate enclosures.
- Control environmental conditions as much as possible.
If yes, protect the lamp from harsh environmental conditions.
If no, proceed to 4.5.
4.5. Was the lamp handled properly during installation (without contamination or damage)?
PROBLEM:
Improper handling can introduce contaminants or cause physical damage, leading to reduced lifespan.
PREVENTION:
- Handle the lamp carefully during installation.
- Wear gloves to prevent contamination.
- Keep the lamp clean and free from fingerprints and dust.
If yes, proceed to 4.6.
If no, replace the lamp, handle carefully during installation, and keep the lamp clean.
4.6. Is the lamp from a reputable manufacturer and not a counterfeit?
PROBLEM:
Counterfeit or low-quality lamps may not meet performance standards and can fail prematurely.
PREVENTION:
- Purchase lamps from authorized dealers.
- Verify authenticity through the manufacturer if unsure.
If yes, proceed to 4.7.
If no, use lamps from authorized dealers.
4.7. Is there a consistent maintenance program in place to enhance lamp life?

PROBLEM:
Natural degradation of UV output occurs during the lifetime of a lamp. There is no significant natural loss however of UV output/degradation under 1,000 operating hours. Apart from ensuring a UV lamp is purchased from a top-quality manufacturer, the lifetime of a lamp is very much dependent on the environment in which it is running.
PREVENTION:
- A consistent maintenance programme and the right operating environment can dramatically increase the lifetime of UV lamps. Under ideal operating conditions, customers have reported gaining an additional 4,000 — 6,000 operating hours by simply following a rigorous lamp and UV system maintenance programme.
- Lamps should be replaced after 1,000-1,500 hours depending on the application and industry. Some industries such as cosmetics and pharmaceuticals religiously change lamps every 1,000 hours, as they cannot risk the loss of UV intensity. To measure the loss of UV intensity, use UV sensitive labels, test strips, or in more detail using instruments such as UV power maps.
If yes, proceed to 4.8.
If no, implement a consistent maintenance program.
4.8. Are you monitoring UV output to determine when to replace the lamp?
PREVENTION:
- Lamps should be replaced after 1,000–1,500 hours depending on the application and industry.
- Use UV test strips or instruments to monitor output.
- Replace the lamp when intensity falls below required levels.
If yes, proceed to 4.9.
If no, use UV test strips to monitor intensity.
4.9. If lifespan issues persist, consult the manufacturer or a professional technician.
5. Is the lamp overheating?
5.1. Is there sufficient ventilation around the lamp?
PROBLEM:
Inadequate ventilation leads to heat accumulation, causing the lamp to overheat.
PREVENTION:
- Ensure vents and cooling fans are operational.
- Do not obstruct airflow around the lamp.
If yes, proceed to 5.2.
If no, improve ventilation.
5.2. Is the lamp operating at the designed power/voltage?
PROBLEM:
Excess voltage can cause the lamp to draw more power, generating excess heat.
PREVENTION:
- Use voltage regulators.
- Verify power supply specifications of the system.
If yes, proceed to 5.3.
If no, adjust the voltage supply.
5.3. Are there any obstructions that may cause heat build-up around the lamp?
PROBLEM:
Physical obstructions can prevent heat dissipation.
PREVENTION:
- Keep the area around the lamp clear.
- Regularly check for and remove any blockages.
If yes, remove the obstructions and improve airflow.
If no, proceed to 5.4.
5.4. Is the lamp being used in an enclosed or poorly ventilated space?
PROBLEM:
Enclosed spaces trap heat, increasing lamp temperature.
PREVENTION:
- Install ventilation systems.
- Use the lamp in open or well-ventilated areas.
If yes, consider improving the enclosure's ventilation.
If no, proceed to 5.5.
5.5. Is the lamp temperature kept below the maximum operating temperature (e.g., below 850°C)?
PROBLEM:
Overheating can cause the lamp to bow or deform, and may lead to cap and seal damage due to excessive temperatures.
PREVENTION:
- Keep lamps below 850°C.
- Adjust cooling and airflow to keep lamp temperature within specified limits.
If yes, proceed to 5.6.
If no, adjust cooling and airflow.
5.6. Is the cap and seal temperature below 250°C to prevent cap and seal damage?
PROBLEM:
High temperatures can cause cap and seal damage, leading to electrical arcing and potential lamp failure.
PREVENTION:
- Ensure proper cooling to maintain cap and seal temperatures below 250°C.
- Check for overcurrent conditions.
- Verify the power supply is operating correctly.
If yes, proceed to 5.7.
If no, ensure proper cooling and check for overcurrent conditions.
5.7. If overheating persists, check for defective components or consult a professional technician.
6. Is the lamp emitting an unusual color?
6.1. Is the lamp surface clean and free from contaminants (dirt, fingerprints, etc.)?
PROBLEM:
Contaminants can alter the light output spectrum, affecting color.
PREVENTION:
- Handle lamps with clean gloves.
- Clean the lamp surface before use.
If yes, proceed to 6.2.
If no, clean the lamp carefully using isopropanol wipes.
Watch Our Video
6.2. Is the voltage supply within the lamp's specifications?
PROBLEM:
Incorrect voltage can alter the performance of the lamp.
PREVENTION:
- Use power supplies that match lamp specifications.
- Regularly check the voltage output.
If yes, proceed to 6.3.
If no, adjust the electrical supply.
6.3. Is the lamp the correct type for the application (e.g. Iron, Gallium, Lead)?
PROBLEM:
Using the wrong lamp type may result in unexpected color emissions. For example, iron-doped lamps should appear blue, and gallium-doped lamps should appear purple. Mercury only lamps should appear white.
PREVENTION:
- Verify lamp specifications before installation.
- Use lamps appropriate for the intended application.
If yes, proceed to 6.4.
If no, replace with the correct type of lamp.
6.4. If the unusual color persists, consult the manufacturer or a professional technician.
7. Is the lamp making unusual noise?
7.1. Is the noise coming from the lamp or the ballast?
PROBLEM:
Unusual noises can indicate mechanical issues or electrical faults.
PREVENTION:
- Identify the source of the noise promptly.
- Regularly maintain both lamp and ballast.
If noise is from the lamp, proceed to 7.2.
If from ballast, proceed to 7.3.
7.2. Is the lamp physically vibrating or loose in its fixture?
PROBLEM:
A loose lamp can vibrate, causing noise and potential damage.
PREVENTION:
- Secure the lamp firmly in its fixture.
- Use mounting hardware as specified by the manufacturer.
If yes, secure the lamp properly.
If no, proceed to 7.4.
7.3. Is the ballast humming or buzzing excessively?
PROBLEM:
Ballasts can produce noise if they are failing or improperly installed.
PREVENTION:
- Install ballasts according to manufacturer guidelines.
- Replace aging or faulty ballasts promptly.
If yes, replace or repair the ballast.
If no, proceed to 7.4.
7.4. Are external vibrations causing noise in the lamp assembly?
PROBLEM:
External sources of vibration can cause components to rattle.
PREVENTION:
- Isolate the lamp from vibration sources.
- Use dampening materials if necessary.
If yes, isolate the lamp from vibration sources.
If no, proceed to 7.5.
7.5. If unusual noise persists, consult the manufacturer or a professional technician.
8. Do you have compatibility questions about the lamp?
8.1. Does the lamp match the voltage and current specifications of your system?
PROBLEM:
Lamps operate at high voltages; if they are too close to any metal work or humidity is high, an earth fault can occur, as the arc jumps to ground. Most control systems will instantly trip out.
PREVENTION:
- Ensure the lamp is correctly positioned.
- Check UV reflectors are not distorted or too close to the lamp body.
- Ensure the right UV lamp is chosen for your power supply.
If yes, proceed to 8.2.
If no, select a lamp compatible with your system.
8.2. Does the lamp physically fit in your fixture?
PROBLEM:
Incorrect lamp size can prevent proper installation and operation.
PREVENTION:
- Verify lamp dimensions before purchase.
- Use fixtures designed for your specific lamp model.
If yes, proceed to 8.3.
If no, find a lamp that fits or adjust the fixture.
8.3. Is the lamp suitable for your intended application (e.g., disinfection, curing)?
PROBLEM:
Using a lamp not designed for your application can lead to ineffective performance.
PREVENTION:
- Select lamps based on application requirements.
- Consult with manufacturers for recommendations.
If yes, proceed to 8.4.
If no, select the correct lamp for your application.
8.4. If compatibility is confirmed and issues persist, consult the manufacturer or a technician.
9. Do you require lamp specifications (wavelength, intensity, etc.)?
9.1. Have you checked the lamp's datasheet or user manual?
PROBLEM:
Lack of specification details can lead to improper usage.
PREVENTION:
- Always obtain and review the datasheet or user manual.
- Keep documentation accessible for future reference.
If yes, proceed to 9.2.
If no, obtain the datasheet from the manufacturer.
9.2. Do you need additional technical details not provided in the datasheet?
PROBLEM:
Insufficient technical details can lead to uncertainty about performance.
PREVENTION:
- Contact the manufacturer for specific queries.
- Request supplemental technical documentation if necessary.
If yes, contact the manufacturer's technical support.
If no, proceed to 9.3.
9.3. If specifications are confirmed and the lamp is suitable, proceed with use.
10. Are there safety concerns regarding UV lamp operation?
10.1. Are you using appropriate personal protective equipment (PPE)?
PROBLEM:
UV exposure can cause skin and eye damage if proper PPE is not used.
PREVENTION:
- Use UV-blocking eyewear, gloves, and protective clothing.
- Install shields or barriers to protect workers.
If yes, proceed to 10.2.
If no, utilize PPE such as UV-blocking eyewear and gloves.
10.2. Is there a risk of exposure to harmful UV radiation?
PROBLEM:
Direct exposure to UV radiation can cause serious harm.
PREVENTION:
- Implement safety interlocks, shields, and barriers.
- Limit exposure time and ensure proper ventilation.
If yes, implement shielding and safety protocols.
If no, proceed to 10.3.
10.3. Are all safety interlocks and sensors functioning properly?
PROBLEM:
Faulty safety systems can lead to accidental exposure to UV radiation.
PREVENTION:
- Regularly test safety interlocks and sensors.
- Repair or replace faulty components promptly.
If yes, proceed to 10.4.
If no, repair or replace safety features.
10.4. Ensure compliance with safety standards. If concerns persist, consult safety data sheets and professionals.
11. Is there physical damage to the lamp or equipment?
11.1. Are there cracks, dents, or discolorations on the lamp?
PROBLEM:
Physical damage to the lamp can impair its performance and safety.
PREVENTION:
- Inspect lamps regularly for visible damage.
- Replace lamps with cracks, dents, or discolorations immediately.
If yes, replace the lamp.
If no, proceed to 11.2.
11.2. Is there damage to wiring, connectors, or fixtures?
PROBLEM:
Damaged electrical components can cause performance issues and pose safety risks.
PREVENTION:
- Inspect wiring and fixtures regularly for wear and tear.
- Repair or replace damaged components promptly.
If yes, repair or replace damaged components.
If no, proceed to 11.3.
11.3. Ensure all equipment is in good condition before operation.
12. Are there issues with lamp installation or replacement?
12.1. Are you following the manufacturer's installation instructions?
PROBLEM:
Improper installation can lead to equipment damage or reduced performance.
PREVENTION:
- Carefully review and follow the manufacturer's guidelines.
If yes, proceed to 12.2.
If no, review and follow the guidelines.
12.2. Are you handling the lamp with clean gloves to avoid contamination?
PROBLEM:
Contaminants like fingerprints or dust can reduce lamp performance.
PREVENTION:
- Wear clean gloves when handling lamps.
- Avoid touching the lamp surface directly.
If yes, proceed to 12.3.
If no, use clean gloves and avoid touching the lamp surface.
12.3. Is the lamp aligned correctly in the fixture?
PROBLEM:
Misalignment can cause improper operation and reduced lamp life.
PREVENTION:
- Align the lamp according to the manufacturer's instructions.
If yes, the lamp is installed correctly.
If no, adjust the lamp for correct alignment.
13. Are there issues with the curing process despite the lamp operating correctly?
13.1. Is the UV intensity sufficient for curing applications?
PROBLEM:
Inadequate UV intensity can lead to incomplete curing of materials like inks or adhesives.
PREVENTION:
- Regularly monitor UV output using test strips or UV meters.
- Ensure the lamp's UV output meets application specifications.
If yes, proceed to 13.2.
If no, replace or adjust the lamp for proper intensity.
Watch Our Video
13.2. Are the curing inks or adhesives properly formulated?
PROBLEM:
Improperly mixed or formulated materials may not cure correctly under UV light.
PREVENTION:
- Thoroughly mix materials before application.
- Follow manufacturer recommendations for UV-curable products.
If yes, proceed to 13.3.
If no, ensure materials are mixed and formulated correctly.
13.3. Are the reflectors clean and properly focused?
PROBLEM:
Dirty or misaligned reflectors can reduce UV output, affecting curing efficiency.
PREVENTION:
- Clean and align reflectors regularly for optimal UV reflection.
If yes, proceed to 13.4.
If no, clean and realign the reflectors.
13.4. If issues persist, consult the material supplier or a professional technician
14. Do you want to enhance the lifetime of the UV lamp?
14.1. Are you following a consistent maintenance schedule?
PROBLEM:
Neglecting maintenance can lead to preventable issues that shorten lamp life.
PREVENTION:
- Implement a rigorous maintenance program.
- Clean, inspect, and maintain the lamp and system regularly.
If yes, proceed to 14.2.
If no, follow a consistent maintenance schedule.
14.2. Are you monitoring the UV output to know when the lamp is reaching the end of its useful life?
PROBLEM:
Failing to monitor UV output can lead to reduced performance and overuse of the lamp beyond its optimal life.
PREVENTION:
- Use UV test strips or meters to monitor UV output.
- Replace the lamp once UV intensity drops below acceptable levels.
If yes, proceed to 14.3.
If no, implement UV output monitoring.